> ## Documentation Index
> Fetch the complete documentation index at: https://docs.supermisson.fun/llms.txt
> Use this file to discover all available pages before exploring further.
# Fund Your Wallet
> Send USDC to your wallet on Base. Auto-bridging handles the rest. No gas fees, no chain headaches.
# Get USDC into your wallet
Supermission runs on USDC. Your wallet lives on Base. When you trade, we automatically bridge USDC to Polygon where Polymarket's orderbook lives. You don't need to think about chains.
 ## Fund your wallet step by step
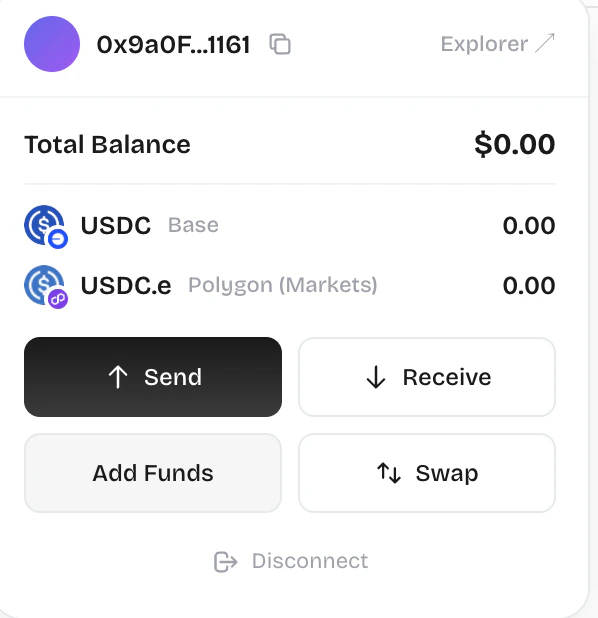
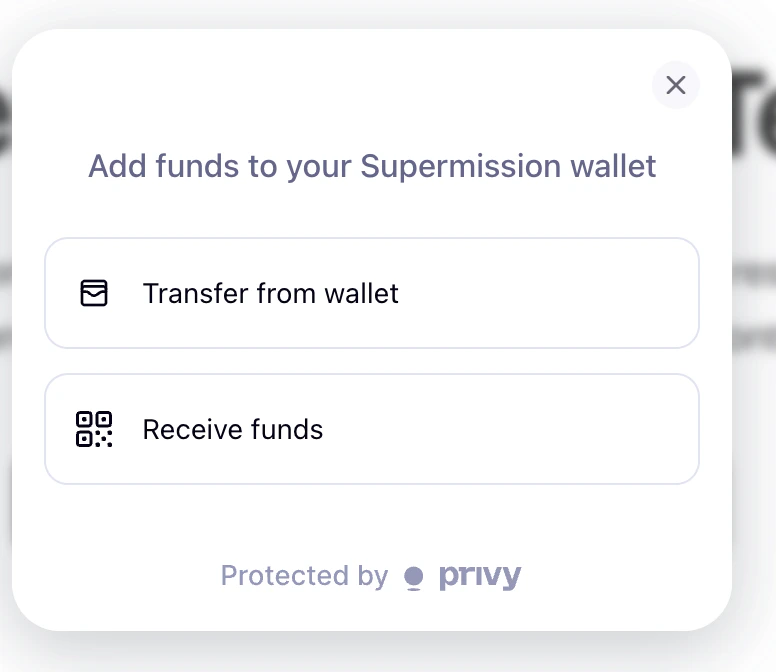
Click the **wallet icon** in the top-right corner of the terminal. This opens the wallet panel where you can see your balance and wallet address.
Click the wallet address (starts with `0x`) to copy it to your clipboard. This is a standard Base wallet address — any USDC sent here will show up in your balance.
Open the platform you're sending USDC from. Common sources:
* **Coinbase** — go to Send/Withdraw, search for USDC
* **Binance** — go to Withdraw, search for USDC
* **Another wallet** (e.g. MetaMask, Rainbow) — tap Send
* **Bridge** — use [Across](https://across.to) to move USDC from Ethereum, Arbitrum, or Optimism to Base
This is the most important step. When choosing the network, make sure you select **Base**. Sending USDC on the wrong network (e.g. Ethereum, Polygon) means your funds won't appear.
Paste the `0x` address you copied in Step 2 into the recipient/destination field.
Enter the amount of USDC you want to send. Double-check the network says **Base** and the address matches, then confirm the transaction.
Base transactions confirm in under 10 seconds. Once confirmed, your balance updates automatically in the wallet panel.
## Fund your wallet step by step
Click the **wallet icon** in the top-right corner of the terminal. This opens the wallet panel where you can see your balance and wallet address.
Click the wallet address (starts with `0x`) to copy it to your clipboard. This is a standard Base wallet address — any USDC sent here will show up in your balance.
Open the platform you're sending USDC from. Common sources:
* **Coinbase** — go to Send/Withdraw, search for USDC
* **Binance** — go to Withdraw, search for USDC
* **Another wallet** (e.g. MetaMask, Rainbow) — tap Send
* **Bridge** — use [Across](https://across.to) to move USDC from Ethereum, Arbitrum, or Optimism to Base
This is the most important step. When choosing the network, make sure you select **Base**. Sending USDC on the wrong network (e.g. Ethereum, Polygon) means your funds won't appear.
Paste the `0x` address you copied in Step 2 into the recipient/destination field.
Enter the amount of USDC you want to send. Double-check the network says **Base** and the address matches, then confirm the transaction.
Base transactions confirm in under 10 seconds. Once confirmed, your balance updates automatically in the wallet panel.
 Your USDC is now in your wallet. Head to any market and place a trade — we handle bridging to Polygon automatically.
Send **USDC on Base** only. Sending other tokens or USDC on the wrong network means your funds won't appear. Double-check the network before confirming.
## Auto-bridging — how it works
When you place a trade, Supermission bridges your USDC from Base to Polygon automatically. Polymarket uses USDC.e (bridged USDC) on Polygon for its orderbook. Here's what happens behind the scenes:
1. You click "Buy YES" on a market
2. We bridge the exact amount of USDC from Base → Polygon
3. USDC converts to USDC.e on Polygon
4. Trade executes against Polymarket's CLOB
5. Your position shows up in the Portfolio tab
You see step 1 and step 5. Everything in between is invisible.
Gas fees are fully sponsored. You pay zero gas for trades, bridging, or any on-chain operations. The only cost is the trade itself.
## How much should you deposit?
Start small. Prediction markets are volatile near resolution and there's real risk of losing your entire position. Deposit what you'd be comfortable losing while you learn the mechanics.
Withdrawals are always available. You can send USDC back out to any wallet at any time from the wallet panel.
Your USDC is now in your wallet. Head to any market and place a trade — we handle bridging to Polygon automatically.
Send **USDC on Base** only. Sending other tokens or USDC on the wrong network means your funds won't appear. Double-check the network before confirming.
## Auto-bridging — how it works
When you place a trade, Supermission bridges your USDC from Base to Polygon automatically. Polymarket uses USDC.e (bridged USDC) on Polygon for its orderbook. Here's what happens behind the scenes:
1. You click "Buy YES" on a market
2. We bridge the exact amount of USDC from Base → Polygon
3. USDC converts to USDC.e on Polygon
4. Trade executes against Polymarket's CLOB
5. Your position shows up in the Portfolio tab
You see step 1 and step 5. Everything in between is invisible.
Gas fees are fully sponsored. You pay zero gas for trades, bridging, or any on-chain operations. The only cost is the trade itself.
## How much should you deposit?
Start small. Prediction markets are volatile near resolution and there's real risk of losing your entire position. Deposit what you'd be comfortable losing while you learn the mechanics.
Withdrawals are always available. You can send USDC back out to any wallet at any time from the wallet panel.